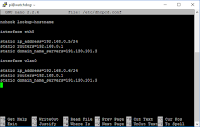
In the command line type "sudo nano /etc/dhcpcd.conf" (without quotes) and press enter.
Go to the bottom of the file and insert the follwing text in order to set a fixed ip for the lan (ethernet) connection.
Go to the bottom of the file and insert the follwing text in order to set a fixed ip for the lan (ethernet) connection.
 interface eth0
static ip_address=192.168.0.10/24
static routers=192.168.0.1
static domain_name_servers=192.168.0.1
If you are using the wlan connection then insert this text.
interface wlan0
static ip_address=192.168.0.11/24
static routers=192.168.0.1
static domain_name_servers=x.x.x.x
static ip_address=192.168.0.11/24
static routers=192.168.0.1
static domain_name_servers=x.x.x.x
press ctrl-x and type "y" to save and exit the configuration file.
static ip_address = the ip to use on the raspberry board. Do not use the same IP at the same time on lan and wlan interface.
static routers= the ip of your home router device, if you don't know this then start a command prompt on your windows laptop/pc and type "ipconfig /all" (without quotest) and then look for the default gateway
static domain_name_server= can be left empty, execpt when your services on your raspberry board need internet. If you don't know this then start a command prompt on your windows laptop/pc and type "ipconfig /all" (without quotest) and then look for the DNS Servers
Now we will configure the raspberry pi 3 wifi module by setting the wpa-supplicant configuration file. Type the following in the command line to the configuration file: "sudo nano /etc/wpa_supplicant/wpa_supplicant.conf" (without quotes). Go to the bottom of the file and add the following Wi-Fi setting, adding your setting in the quotation marks.
network={
psk="Your_wifi_password"
}
press ctrl-x and type "y" to save and exit the configuration file.
As from now you need to use the static ip_address that you configured to connect to the raspberry via putty.
press ctrl-x and type "y" to save and exit the configuration file.
Another wifi tutorial can be found via this link
now restart your raspberry pi 3 board by typing "sudo reboot" (without quotes) and press enter.

No comments:
Post a Comment