Wifi and IP configuration

In most of my projects I will use the raspberry board as a server device. This means that it hosts features or services which are shared on the network and can be used by all other devices on my home network. In this case best practice is to use a fixed IP (static IP). When you use the default DHCP configuration your IP might change from time to time. The raspberry board will no longer send an IP DHCP request, it will just use the IP set in our configuration file. On all other devices connected to my home network we can than use this static IP to connect or use the services hosted on the raspberry board. Another tutorial can be found via this link

In the command line type "sudo nano /etc/dhcpcd.conf" (without quotes) and press enter.
Go to the bottom of the file and insert the follwing text in order to set a fixed ip for the lan (ethernet) connection. 
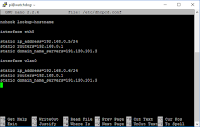
     interface eth0

     static ip_address=192.168.0.10/24
     static routers=192.168.0.1
     static domain_name_servers=192.168.0.1

If you are using the wlan connection then insert this text.

     interface wlan0

     static ip_address=192.168.0.11/24
     static routers=192.168.0.1
     static domain_name_servers=x.x.x.x


press ctrl-x and type "y" to save and exit the configuration file.

static ip_address = the ip to use on the raspberry board. Do not use the same IP at the same time on lan and wlan interface.
static routers= the ip of your home router device, if you don't know this then start a command prompt on your windows laptop/pc and type "ipconfig /all" (without quotest) and then look for the default gateway
static domain_name_server= can be left empty, execpt when your services on your raspberry board need internet. If you don't know this then start a command prompt on your windows laptop/pc and type "ipconfig /all" (without quotest) and then look for the DNS Servers


Now we will configure the raspberry pi 3 wifi module by setting the wpa-supplicant configuration file. Type the following in the command line to the configuration file: "sudo nano /etc/wpa_supplicant/wpa_supplicant.conf" (without quotes). Go to the bottom of the file and add the following Wi-Fi setting, adding your setting in the quotation marks.
   network={
       ssid="The_ESSID_from_your_home_network"
       psk="Your_wifi_password"
   }

press ctrl-x and type "y" to save and exit the configuration file.


Another wifi tutorial can be found via this link


now restart your raspberry pi 3 board by typing "sudo reboot" (without quotes) and press enter.
As from now you need to use the static ip_address that you configured to connect to the raspberry via putty.


Initial OS configuration

The raspberry linux os (operating system) is booted. We will use the putty application on the (windows) laptop/pc to start a remote connection to the raspberry board in order to execute some initial setup and configuration.

first connect to your home router and try to find out what IP was given to the raspberry board. By default the raspberry ethernet connection is set to DHCP. It will send a IP request on your home network and your home router will answer to this request. On most home routers you should be able to find the list of IP's that was given to all devices on your home netwerk.

- start putty on your (windows) laptop/pc
- in the hostname field type the ip of your raspberry board 
   (a common used ip range looks lik this. 192.168.0.xxx)
- make sure ssh is checked and port is 22
- click open
- now a new window will popup asking for your username and password
- first type "pi" (without quotes, this is the default user on a raspberry pi os)
- then type "raspberry" (without quotes, this is the default/initial pasword for the pi user)
- now you are remotely logged in on your raspberry board and you can execute commands


The first configuration we will do are some basic settings. Changing time zone, changing hostname, changing default password...

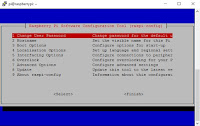
- type "sudo raspi-config" (without quotes) and press enter.
- now a menu should open. You can use the arrow and enter keys to walk throuh the different menus.
- go to menu 4 (Localisation Options) and press enter
- go to menu I2 (Change Timezone) and change your time zone
- go to menu I4 (Change Wi-fi Country) and change your contry
- go back to main menu
- go to menu 2 (Hostname) and fill in an appropriate hostname
- go back to main menu
- go to menu 1 (Change User Password) and change the default password.
next time you connect to your raspberry will use this new password
- go to finish and press enter
- choose to reboot
if the reboot option wass not provided then reboot the system by typing "sudo reboot" (without quotes)

- wait 1-2 min.
- then reconnect to your raspberry board with putty as explained in the first steps.
- we will now update the system's package list by entering the following command: "sudo apt-get update" (without quotes)
- wait until the job is done
- upgrade all your installed packages to their latest versions with the command "sudo apt-get upgrade" (without quotes)


Getting started

What do you need to buy:
 - Raspberry Pi 3 model B board
 - 5 volt 2.5A microB usb power supply (recommended 3A or higher when connecting erxternal hardware/sensors)
 - 8GB (or higher) microSD card (optional with SD adapter)


What should you allready have
 - Laptop/PC with microSD or SD card slot
 - a wifi router with wired ethernet connections


A basic how/to or getting started with raspberry pi guide can be found at the raspberry official website.

For my project I'm going to setup raspberry board that is not connected to a display, nor keyboard and mouse. The raspberry pi will act as a sensor server. It collects/handle all sensor information and execute jobs depending on the sensors data. The management and configuration of the board will be done remotly via ssh connection. Later it might be possible to setup and create a user friendly webinterface on the raspberry pi board.

on your (windows) laptop/pc
- download Putty
- download Win32DiskImager
- download the raspberry pi linux distro. I downloaded the  RASPBIAN JESSIE LITE
- insert the microsd card
- start the Win32DiskImager application
- Use the Win32DiskImager application to write the raspbian jessie lite operating system image to the microsd card
- wait until job is done
- remove sd card from your laptop/pc


on your raspberry pi board
- insert micro sd card
- connect network cable to your home network (router)
- connect 5v micro usb power adapter
- the board will power on and load the raspbian operating system (red led and green led visible)
raspberry pi 3 green status led


raspberry pi 3 red status led